Showing posts with label Creativity. Show all posts

Hello messenger's, we are here today to spice up your normal life little bit! Whatsapp in new interface that you can't resist to use...


It has amazingly new design with same features, below is the preview of new whatsapp material UI: 


To install new whatsapp material UI :

 1. Download the apk from this link.

 2. Move apk in your phone and install it (it will not delete your data).

We hope so you will love it...meet you next time only on Creativity in Air to make you look & feel creative!

Using your keyboard or mouse from a distance sometime's can become troublesome & uncomfortable, solve your problem with this post!


So today we are here with couple of android app's through which you can control your PC.

We all have experienced this trouble of handling keyboard and mouse from a distance in one or in another way...imagine you are watching a film with your family, suddenly an inappropriate content roll's and you like OMG, rushing toward's PC to skip that part, but now you don't have to worry about all that stuff :P

We have two apps for this purpose:

 1. Unified Remote Control,

 2. Teamviewer

They both need a software to be installed in your computer & they both have their own advantages and disadvantages.

Unified Remote Control:

 Advantage's:

 1. Built in with useful remote's, it contains almost each and every type of remote you would have been using till now in your window's PC for e.g. media player's(such as VLC, GOM, Windows media player, etc), Browser(such as Firefox, Chrome, etc) and many more.

 2. Can sync to your PC/Laptop with Bluetooth and Wifi through which your computer is connected too.

 3. Spacious mouse pad with shortcut customization.

 4. Has a file manager that help's exploring content of your hard disk and on selection of a file, open's the file in your PC.

 5. It also has remote's to control your system(Shutting down, restarting, Screen Off, etc).

 6. As it can connect to bluetooth, you can use it out of the home too where you don't have wifi.

Disadvantage's:

 1. Unable to display the actual screen of your monitor in android device, making it complex for some people and for minute option's to select on your PC.

 2. Compulsary to stay within certain range, computer needs to be connected with same wifi in order to work.


 Teamviewer:

Advantages:

 1. Overcome's the disadvantages of unified remote control by enabling the full screen of your monitor in android device.


 2. Can sync to your PC/Laptop with any wireless network (Wifi, mobile data), i.e you can operate your computer from any part of the world.

3. You can aslo share files between your computer and android.

Disadvantage's:

 1. Can't connect through Bluetooth, internet is compulsion.


Depending on your usage and comfortable one, proceed below to install.


Requirement's to install Unified Remote Control:

 1. Android device,

 2. Unified Remote Control apk (this paid app is provided free for youdownload) and

 3. Computer installation file (you can download .exe file from www.unifiedremote.com or download it from here)

Instruction's:

 1.Install the .exe file on your computer, by downloading it from above link.

 2. Install the apk and open it, it will ask you whether you have installed the server or not, proceed as we have downloaded and installed the .exe file.

 3. Next screen will present you with the connection of your server, it will ask whether you will "add server manually" or "add a server later", select later and proceed till finish.

 4. You will be presented with the following screen, select "Servers" to add a server:

 5. In your android phone you will be having the following screen, select '+' symbol and it will prompt you a window with option "Automatic" and "Manual", select "Automatic":


 6. Run unified remote from your computer and make sure it is running by checking the following symbol:


 7. After selecting the "Automatic" option in your Android phone, Unified remote app will start searching for server automatically and if everything is correct it will come up with your PC/Laptop name in which the server is running. Just tap the server and we are done! Below is the image in my case:

(If you are unable to find your server try refreshing it by the refresh symbol located at top-right corner)

**Note- restart server from PC fully, if you have any problem during connection.

 8. Now, we are ready to control our computer with android device. Move back to the home page of app and select "Remotes":

 9. The Remotes option will be containing all the Remotes..try selecting "Basic Input", it will come up with mouse pad. Drag on mouse pad and your computer's mouse will be acting according to you.


This was all about Unified Remote Control, hope so you enjoy using this app!


Proceeding with the requirement's to install Teamviewer:

 1. Android device,


 3. Install Teamviewer software on computer(download, it is an patched version. Follow the instructions of notepad file)

Instruction's:

 1. Download and install the apk on your android device.

 2. Download and install .exe from above link on your computer. Install it with the instructions provided in the Notepad.

 3. Start Teamviewer in Computer, it will look like this:


 4. The selected area show's the ID of your computer through which your computer is identified uniquely and the below password is changed every time, if you want to set personal constant password set it by selecting "Extras|Options|Security|Password".  

 5. Finally we are almost done, open the app from your android and enter the ID of your computer in your phone and select "Remote Control", it will prompt you to enter password, enter it and you will see your monitor !


So this end's the article, now you can choose anyone of them ...both of them have their own advantages and disadvantages...

It's been a long day..see you next time with another technology or creativity..If you like this post then please +1 or share this post...feel free to comment... 


"Today we will see how to make a phone detect NFC even when it is locked or in screen off state"


Isn't it's troublesome to unlock your device every time you want to make NFC work ?

Probably yes, so today we are going to change the functionality of our device by making the phone detect NFC even when it is in locked or screen off state.

Requirements:
 1. Rooted Android device,                                                                                             
 2. Xposed Installer apk(download)
                                                                                
(NEEDS ROOTED PHONE TO INSTALL XPOSED INSTALLER)

How to install xposed installer apk:

 1. Download the apk file and install it in your device.                                                     
 2. Once downloaded open the app and select Framework, you will get the following screen before selecting:               


 3. After selecting Framework select Install/Update: 
          

 4. Selection of the above option will install the necessary files required by Xposed installer in order to work. Once installed it will ask for reboot, select OK and the device will reboot.                                                                                                     
 5. Once device gets rebooted open the Xposed Installer app and  in Framework you should see the below changes: 


 6. Now we are ready to download a module of Xposed Installer that will help us keeping NFC on even when device is locked or in screen off state.                                                                            
 7. To download a module select Download  from main screen of the app:

    
 8. In Download section search for the module "NFC LockScreenOff  Enabler". Select it, it will open a Description tab, slide left to move from Description tab to Versions tab. Download the latest version and let it install.                                                                                                           
 9. Once downloaded move into Modules from main screen of app, here you will see your downloaded module...currently the below one:                                      


             (Check the checkbox to enable this module)                                                    
 10. Tap NFC LockScreenOff Enabler, this will redirect you to it's main screen. Now here we are going to select "Enable NFC when option" , below is the image: 


  (And then select "screen is off(regardless of lock state)" this will enable NFC even on lock state)   


Cheer's we are done with our customization. Exit the application and try touching your NFC tag when your phone is in locked or screen off state.


If you encounter any type of problem feel free to comment and we will try to solve the problem. 

Hello guys, if you liked the above post please comment and +1 on google.
Your support will be appreciated.


Ever thought about creating your normal watch into a cool NFC watch with just a metro token ?


Hello guys, today we will be transforming our normal watch to a cool NFC watch that can just amaze your friend's circle for sure.

The best part about this article is that you can create this watch within a dollar or less, it may depend on token's cost.

Requirements :

 1. A Smartphone having NFC(how to check NFC exists in your smartphone or not ?),

 2. A metro token(that works on NFC),

 3. NFC ReTag app(download),

 4. Last and the obvious one...a watch(using other item rather than watch is not crime or illegal you may continue with your own item).


Very first thing, what actually a NFC will do for us....so answer is very simple, it will set the smartphone's setting automatically that we had set in our application just by touching the watch.

Before we start I would like to clear basically what NFC(Near Field Communication) is:


So basically a NFC is a wire-less technology, that uses magnetic field induction to enable communication between devices when they're touched together, or brought within a few centimeters of each other.


A Metro token contains NFC/RFID chip that will work for us, isn't it's cheap enough ? :P


So now we are ready with basic idea to create our own hand made NFC watch:


In my case I have a Metro token which looks like as shown below:


 1. Now install the NFC ReTag apk mentioned in above step.                                            
 2. Open the app and touch the token at the back of your smartphone direction toward's battery (Make sure NFC is enabled in the phone).                                                         
 3. You will see a screen like this indicating that it has detected an NFC with a particular ID :


4. Select the option Add Tag.

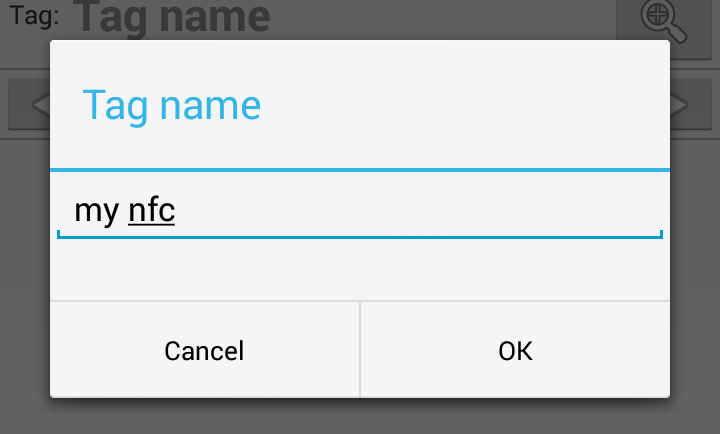
5. It will ask you to name the tag. Name it  as you like..in my case I am naming it as "my nfc".


   6. You will be presented with the below screen. This screen is the actual playground where you can make your own strategy. Select Activity option located at the bottom right of your screen.


7. It will present you with the following screen, this screen allows you to select whether which type of options or settings you want to set when your device touches this NFC tag/token. For e.g. I use it as to change my profile to outdoor settings. So when I move out of the home I would like to disable my wifi and enable mobile data instead, start music player and also show a popup that outdoor settings are now activated (I am positive that you can come up with your own settings that will be well suited for you).

 8. So overall below image is a simple example of my setting:


 9. Now we are almost done with settings. You can test whether your settings are working as expected or not. 

10. Here comes an additional part, it's optional. You can add a cycle, now what is a cycle...don't worry its simple. Cycle is an option that lets you describe the functionality that what settings to be made when phone is touched to NFC the second time for e.g. In my case, once the phone is touched  to NFC it goes in outdoor settings but when it is touched again it changes to indoor settings(Obviously you need to mention the indoor settings as we had set the outdoor settings above). I think this will b enough to make you understand about a Cycle.

11. Lets see how to do this. Select cycle and add new cycle as mentioned in below image:
   

12. Simply add the settings you would like to change when phone is touched to NFC the second time(Note that you can add as much cycle as you want).Below is the settings for indoor mode: 


Wifi gets ON and mobile data gets OFF, shows popup and closes the app Music if it was playing.

13. Congratulations, you have configured your NFC to make it work with your smartphone although it was a long journey to reach at this point.. but it is worth enough.

14. Now, the only part remains is where is the NFC watch ?
So simply take your metro token and take out the chip existing in it with care.Make sure you don't break or damage the chip.It will be containing the chip like below image (it my vary):


(Try cutting the token with edges so that our chip is safe)


(You will get the following chip and this chip you need to implement in your watch or anywhere you wish just make sure that the distance between token/chip and phone doesn't gets increased otherwise it may fail to detect)


(Implementing NFC in a watch)


15. Take your watch or any item that u want to make NFC wearable and try to stick this chip without folding or damaging the chip. Now try and amaze your friend's with this cool NFC watch all made by you, making them curious about how it is working or how you just created this awesomeness.

(NFC doesn't works when screen is off or locked. To make it work please visit this link)

Thumbs up and finger's crossed. Best of luck. See you again with some another creativeness that can amaze you and your friend's circle.